Sunday, January 12, 2014

The monster in my bathroom

Fun monster cut from vinyl with my silhoette.

I put it on the cabinet in my kids bathroom - so much fun!

I plan on adding more monsters to the same bathroom, so we can call it "The monster bathroom" but wanted to add one first to see the kids reaction. They loved it :-)


Tuesday, January 7, 2014

Calendar creation

In Yesterday's post - Tissue boxes and post-it notes desk holder with 2014 calendar I showed you the 2014 calendar I had created for the post it desk holder and said I had a few insights into the process of creating it. I got a few requests to share those insights.

It is always fun to learn that people like what I do and actually take the time to read what I write.

So hear goes.

I printed  4 months on one A4 paper and then run it trough my silhouette for cutting.


Here are a few lessons from the print and cut process:

1. After printing, immediately get that to the Silhouette, Don't touch the file in the silhouette studio on the computer, not even to check if the lines are correct. do all your checking before.

2. Place the page on the left top corner of the mat. Don't place it anywhere else on the mat. The Blade will not find your print and cut markings if the page is not at the top left corner. I alternate my mat direction and turn it around each time (the arrow points up and down alternatively), but the page is always on the left top corner.

3. Make sure you have enough light in the room. I did my calendar creation late at night and found that I need to turn on another light just to get a good alignment. I had a few pages printing off side until I figured this one out.

4. I used a regular printer paper and so I used my most used mat, so it will be less sticky and will not tear the paper.

To get the pages stick together I used clipping and then white glue.


 After applying the white glue I added a third clip (making sure it will not touch the glue) and then let that dry for a few hours.


I think this is all I have for now.
Thanks for reading.

Monday, January 6, 2014

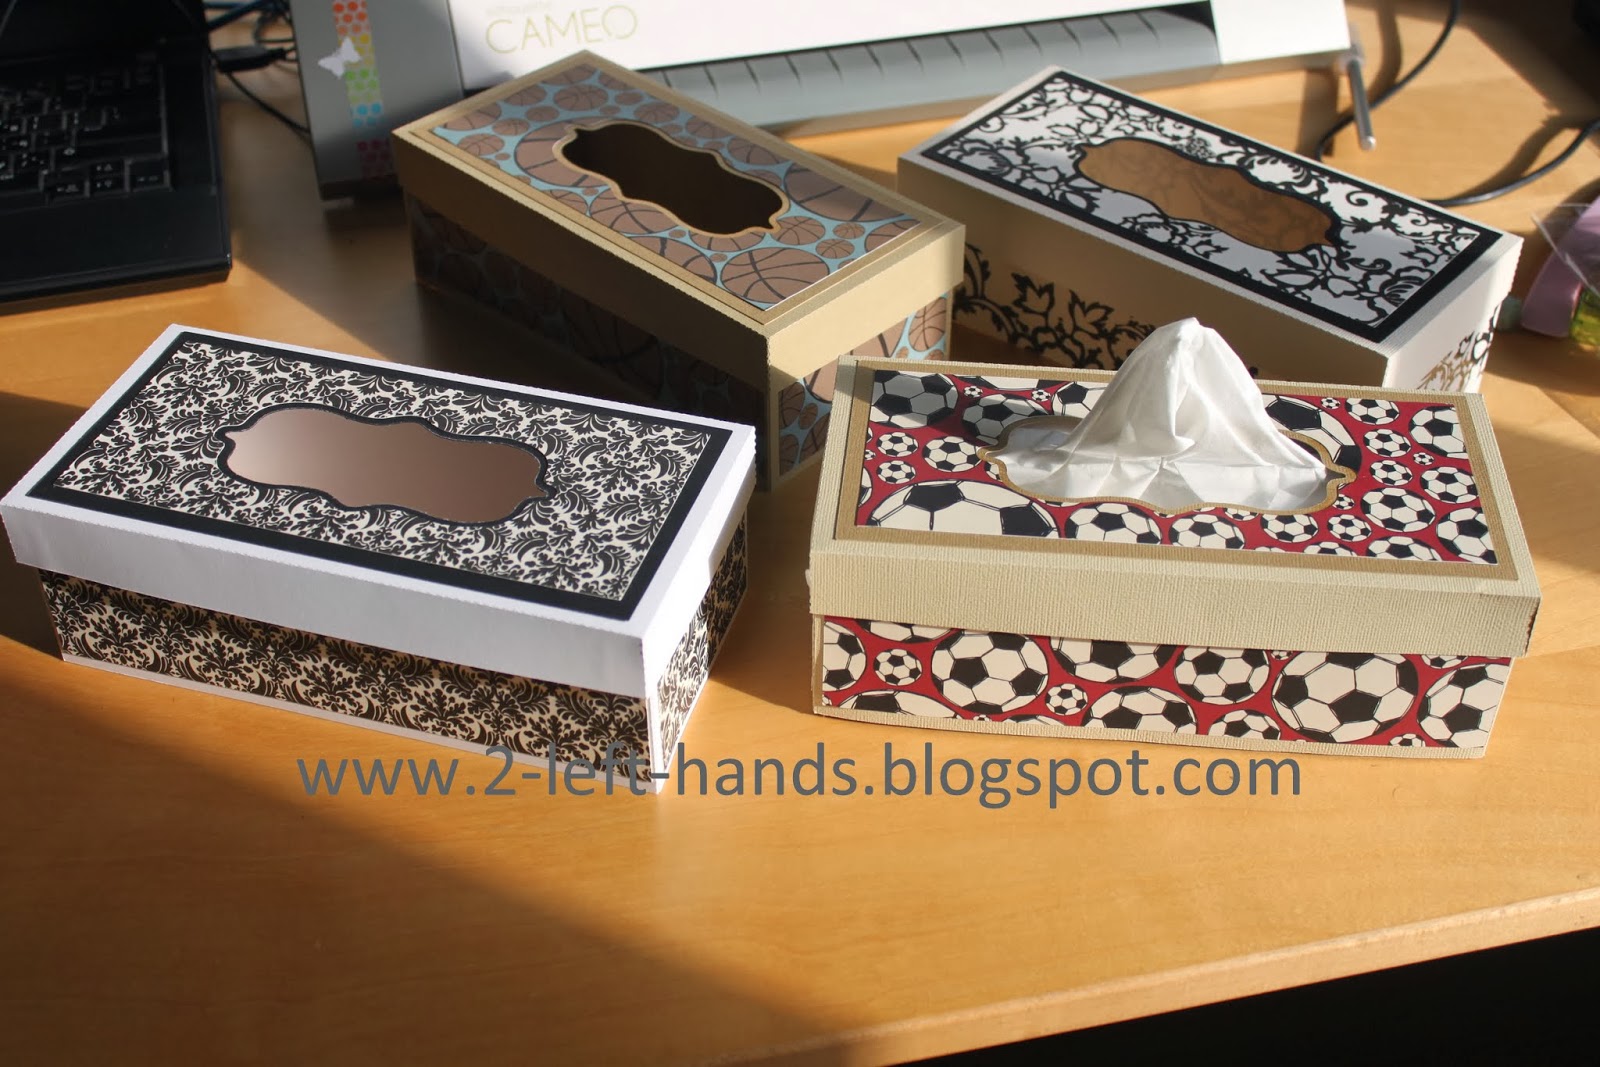
Tissue boxes and post-it notes desk holder with 2014 calendar

First project for 2014 and it was a fun one.

A while ago (who am I kidding - a year ago, that's how long it was...), I created those tissue boxes for the small tissue boxes and my kids asked for one for their rooms, so finally, after a full year I found the time and energy to create a new file for the big long tissue boxes.

I combined it with a gift to a friend I wanted to make for her office. The free file from Silhouette  this week (2014 calendar) was the perfect addition to my post it desk holder.


I liked it so much, and once you make one, it's not that time consuming to make more, so I was on a roll and made one more set:


and a few more individual tissue holders, the sports themed ones are for my boys.


and two post it notes desk holder with 2014 calendar on the other side. Believe it or not, but the print and cut feature of the calendar was the part that took me the most. I have so many insights as to what to do and not to do on that subject. If there is a request I will have a post on the subject.


So much fun to do all that.

I love it when people share their files with me, so I want to give back and here are the files I created:
1. Tissue box files - created for tissue box size: (10.5*22*7 CM) / (4 1/8 * 8 6/8 * 2 3/4 IN)
2. Post it notes Desk Holder

I would love to hear what you think and if you create anything with my files, please link in the comments so I can see.

Thursday, January 2, 2014

Review of 2013

It's a tradition already, so here goes - all of my creations in the year 2013.

January


February


March


April


May


June


July


August


September


October


November


December


Look back at 2012 and 2011

Tuesday, December 31, 2013

Aesthetician gift

My brother in low's girl friend is an aesthetician (beauty therapist) and I wanted to help her decorate her clinic.

I am really pleased with how it turned out and with the cut quality of my silhouette.

This signs were made and printed with the computer. The frame is from Ikea and I colored it with acrilic and then painted over with glitter mod-podge. The flowers were traced and cut with the Silhouette.


On these signs the background is a lovely fabric from make badim and the text was cut with the silhouette from fuzzy vinyl.


Happy 40

I wanted to show you two more projects before the end of 2013.

This is a card for a man so I went with two manly colors :-)


Supplies:


הודעה בנוגע ללינקים באתר

בחלק מהלינקים באתר (אמזון, סקראפבוק וסיימון) יש לי שיווק שותפים שזה אומר שאם אתם קונים מהלינק שלי אני מקבלת עמלה קטנה ולכם זה לא עולה יותר (באמת שלא... בדקתי את זה).