Showing posts with label wall art. Show all posts

Sunday, July 29, 2018

Crayons Art


כבר מלא מלא זמן אני רוצה לנסות לעשות תמונה עם Crayons נמסים. את הילד החמוד חתכתי מויניל שחור, וחתכתי עוד חתיכה מויניל שקוף והדבקתי על הויניל השחור כדי להגן על התמונה מהשעווה ואחרי ההמסה הורדתי את הויניל השקוף.

יצא לא רע, אני צריכה עוד לחשוב איך דואגים שהשובלים של השעווה לא יתאחדו אחד עם השני, אבל בשביל פעם ראשונה אני די מרוצה.


קניתי מסגרת באיקאה וזה מתנה לאחיין המתוק שלי. עכשיו רק נראה כמה זמן יקח לגיסי לתלות את זה על הקיר :-)


Saturday, July 11, 2015

Kids Information Wall Decoration

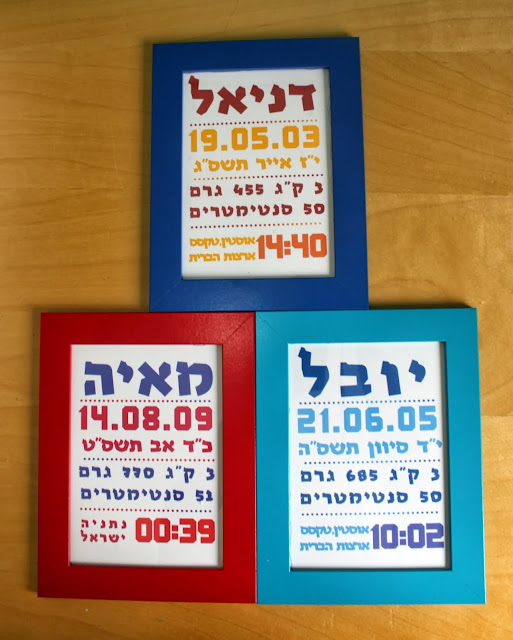
לפני שנתיים (או קצת פחות) הכנתי לכל אחד מהילדים שלי תמונות לקיר עם הנעליים הראשונות שלהם, השם שלהם ומידע אישי כמו תאריך לידה, מקום, משקל וכו'. 

הבת של בן דוד של בעלי  (שהם גם שכנים וחברים מאוד טובים) ביקשה כזה בדיוק ליום ההולדת שלה גם. היא בת 11 ולכן היא עזרה לי להכין. היא בחרה את הצבע ומיקמה את הכפתורים.


אלו שתי מסגרות רגילות מאיקאה שצבעתי בצבע ספרי של MTH ואחר כך ריססתי עם ספרי נצנצים. יצא ממש מדהים. הספרי הזה מצויין, שכבה אחת או שתיים מספיקות לכיסוי מושלם והצבע לא מתקלף בכלל.

את הטקסט כתבתי בPOWER POINT ובחרתי את הצבעים באמצעות אתר שמאפשר התאמת צבעים. הכנסתי את המספר של הצבע ספרי וכך בחרתי צבעים תואמים.

האות ג הגדולה נחתכה על ידי הסילואט והמסגרת מסביב צוירה על ידי עט הסקטץ של הסילואט. פשוט וקל!


תקריב לנצנצים. זה כל כך מוסיף (במיוחד שזה בנות).

עכשיו אחותה הקטנה ביקשה גם :-)


Thursday, April 16, 2015

תמונת פרפרים

תמונה שעשיתי ממזמן ומשום מה לא פרסמתי עדיין.

מאוד אוהבת את איך שזה יצא. הבסיס הוא דף טישו של טים הולץ. עליו עשיתי החתמות עם חותמות פרפרים של הירו ארטס. ובסוף הדבקתי פנצ'וצ'ים של פרפרים בצבעי הקשת.


חומרים:

עט נצנצים (שקוף) - Zig Wink Of Stella Brush Clear

Tuesday, December 31, 2013

Aesthetician gift

My brother in low's girl friend is an aesthetician (beauty therapist) and I wanted to help her decorate her clinic.

I am really pleased with how it turned out and with the cut quality of my silhouette.

This signs were made and printed with the computer. The frame is from Ikea and I colored it with acrilic and then painted over with glitter mod-podge. The flowers were traced and cut with the Silhouette.


On these signs the background is a lovely fabric from make badim and the text was cut with the silhouette from fuzzy vinyl.


Tuesday, December 10, 2013

My kids wall decoration project

היום פרוייקט שאני מכינה וחושבת עליו כבר הרבה זמן וסוף סוף היה לי זמן לשבת ולסיים אותו.

הרעיון הוא שכל המסגרות יהיו תלויות אחת ליד השניה בחדר של כל ילד.


בכל מסגרת (מאיקאה) הכנסתי את הנעליים הראשונות שלהם עם תמונה שלהם לובשים אותן. כל כך נהניתי להכין את זה. הבן הבכור שלי הוא כבר בן 10 כך שמדובר על משהו שקרה לפני הרבה שנים והיה כיף להזכר איזה קטנים וחמודים הם היו (עדיין חמודים אבל כבר לא קטנים...).


את המסגרות של הכפתורים מאוד נהניתי להכין. השתמשתי בסילואט כדי לחתוך את האותיות וגם כדי לשרטט את הקווים מסביב. השתמשתי בעט כסף והתוצאה מבריקה ומנצנצת.


Thursday, December 5, 2013

Cats Wall Stickers - Quick home decoration project

I am in the midst of redecorating my kids rooms and one of the things they asked for is new wall stickers.

We looked around and it is extremely expensive here in Israel, so I had an idea to do it myself with the Silhouette. As a test case, I printed a few cats stickers from simple wall paper.

It turned out so cute. I am really loving it.


Saturday, April 27, 2013

Fun to sew

Last week I finished "Basic Sewing" class with Talia at Thalia.Fab.Lab. It was so much fun.

I decided to make the instructor a sign for her wall. The sewing machine was cut with the Silhouette and the letters are from Mastikim (It says in Hebrew: Here it's fun to sew).

The background was embossed with the Wicker Weave cuttlebug embossing folder and for the frame I used washi tape. You can tell I had a great time at this class as I used one of the washi tapes I really like and I only use it for people I really like :-)


I am adding this to the Simon Says Stamp - anything goes challenge.

Thursday, April 18, 2013

Home Decor - Wall Art with Fabric

I worked on this project for the past year (on and off of course) and I can't be any happier that it is finally finished and hanged on the wall.

All and all it didn't take that much time to finish, just figuring out what I want to do, buying all the items I need and actually doing it, took a long time.

It started with 9 white canvases, size 12''*12'' / 30cm*30cm.

I covered them with Fabric I bough at MakeBadim, and nailed it to the canvas with stapler gun. Then this entire piece set in my closet for at least 6 months until I figured out how I wanted to decorate it.

The decorations are made from Fuzzy Brown Adhesive Vinyl by Silhoeutte (I don't see it on their store now, but it's like regular vinyl only with fuzzy fabric on top)

I glued it all to a white backing made from plywood and hanged it on the wall. I had to use the plywood because there was no way I (or to be exact - my husband) would be able to hang all 9 canvases so straight if each one was individually hanged.

Here is a picture of how it looked on the wall. It is on the second floor and you can see when walking on the first floor.


Here is a close up on the fuzzy vinyl and the flourishes.


And a close up to the actual canvases.


הודעה בנוגע ללינקים באתר

בחלק מהלינקים באתר (אמזון, סקראפבוק וסיימון) יש לי שיווק שותפים שזה אומר שאם אתם קונים מהלינק שלי אני מקבלת עמלה קטנה ולכם זה לא עולה יותר (באמת שלא... בדקתי את זה).